Infrastructure as Code in practice: Building a Blue Team lab with Bicep
In this post we'll explore using Bicep to automate the deployment of a Blue Team lab environment in Azure consisting of an Active Directory domain, Microsoft Sentinel and the Azure Monitor Agent...
Warning: this post has not been updated since 2022, and is likely outdated. Please refer to Microsoft’s documentation for more up-to-date information.
Introduction
Experienced cyber security professionals often recommend students looking to break into the industry invest in a home lab, and I wholeheartedly agree - it’s one of the best ways to learn fundamental concepts such as networking, Windows internals and Active Directory administration by putting these skills into practice in a self-contained environment. However, if you’re anything like me you’ll tend to spin up new lab environments on a whim only to then rip them down and recreate them a few days later, which can quickly become onerous. You know the saying - if you do it more than once, automate it - and what better way to do that than with Infrastructure as Code?
In this post we’ll explore using Bicep to automate the deployment of a Blue Team lab environment in Azure consisting of an Active Directory domain, Microsoft Sentinel and the Azure Monitor Agent. I’m going to assume you have access to an Azure subscription - if not, you can create a free Azure account that comes with $200 USD credit you can use in the first 30 days to start learning.
All of the code described in this post is available on GitHub for download.
Getting started with Bicep
So, what is Bicep? Microsoft’s documentation summarises it pretty well:
Bicep is a domain-specific language (DSL) that uses declarative syntax to deploy Azure resources. In a Bicep file, you define the infrastructure you want to deploy to Azure, and then use that file throughout the development lifecycle to repeatedly deploy your infrastructure.
Essentially, we create a file that describes what we want - such as a simple network consisting of several virtual machines - and give that file to the Azure Resource Manager, which does the hard work of figuring out how to deploy everything behind the scenes. Bicep is also idempotent, meaning we can redeploy the same file over and over again without affecting the state of any existing resources.
Before we get started designing the lab we’ll need to set up our local environment for developing and deploying Bicep files. This is thoroughly explained in the Bicep documentation, but it’s pretty much just a matter of installing Visual Studio Code (our IDE of choice), the Bicep extension for Visual Studio Code (for syntax highlighting and autocompletion) and the Azure CLI (for building and deploying our Bicep files to Azure).
Once you’ve got everything set up, let’s take a look at an example Bicep file for deploying a storage account so we can go over the basics:
1
2
3
4
5
6
7
8
9
10
11
12
13
14
param storageAccountName string = 'toylaunch${uniqueString(resourceGroup().id)}'
param location string = resourceGroup().location

resource storageAccount 'Microsoft.Storage/storageAccounts@2021-06-01' = {
  name: storageAccountName
  location: location
  sku: {
    name: 'Standard_LRS'
  }
  kind: 'StorageV2'
  properties: {
    accessTier: 'Hot'
  }
}
Starting from the top of the file:
- We define parameters for the name of the storage account and the region in which it will be deployed, and initialise those parameters with some default values.
- We use the resource keyword to create a resource of type ‘Microsoft.Storage/storageAccounts@2021-06-01’ (a string composed of the resource provider, type and API version) and define a symbolic name of ‘storageAccount’, which is a unique identifier for the resource we can use to reference it throughout the file.
- We define a set of properties for the storage account such it’s name and location (as per the parameters above) but also the pricing SKU, what kind of storage account it is, and the access tier.
In order to deploy the Bicep file, first sign in to your Azure account with the Azure CLI and run the following commands to create a resource group in your desired region (Australia Southeast in my case) and create the deployment:
1
2
az group create --name myResourceGroup --location australiasoutheast
az deployment group create --resource-group myResourceGroup --template-file main.bicep
Azure Resource Manager will accept the Bicep file, compile it into an ARM template and provision your resources accordingly. Alternatively, we can build the Bicep file into an ARM template manually using the Azure CLI and deploy the resulting JSON file by uploading it to the Azure Portal:
1
az bicep build --file main.bicep --outfile azuredeploy.json
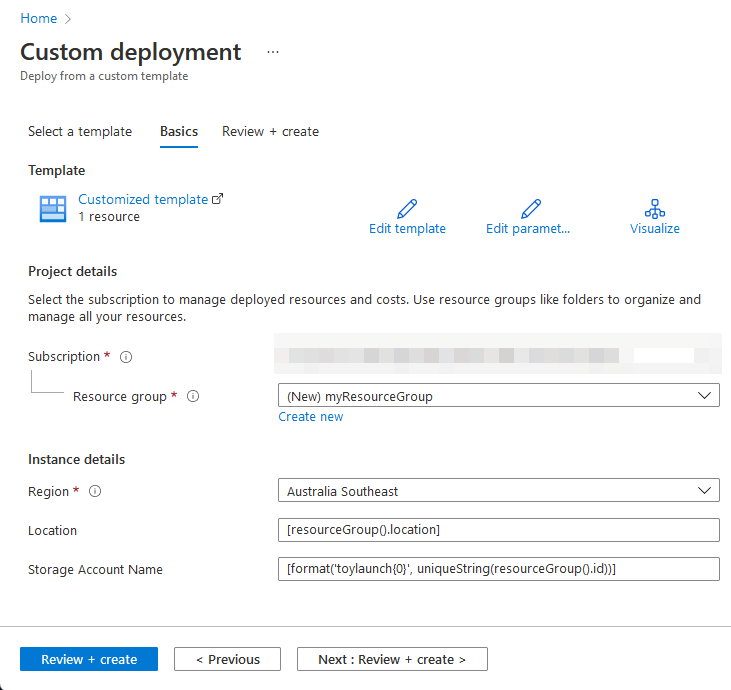
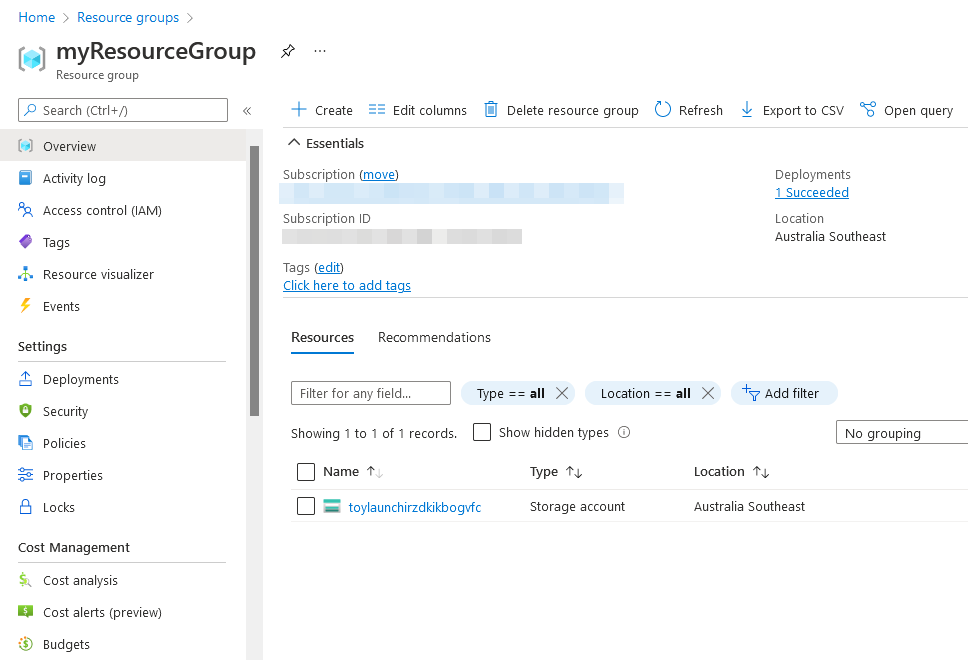
Regardless of how you choose to deploy the file, when the deployment finishes you should see a message indicating it succeeded and your resources will have been provisioned accordingly:
Once you’re satisfied everything is working as expected, use the Azure CLI to delete the resource group, since we won’t be needing this storage account for our lab environment:
1
az group delete --name myResourceGroup
That’s really all you need to know to get started with Bicep. I won’t be covering the fundamentals in much more detail in this post, so if these concepts are new to you I would highly recommend checking out the Bicep modules on Microsoft Learn and watching John Savill’s amazing video on the topic before progressing on to the next section.
Planning the deployment
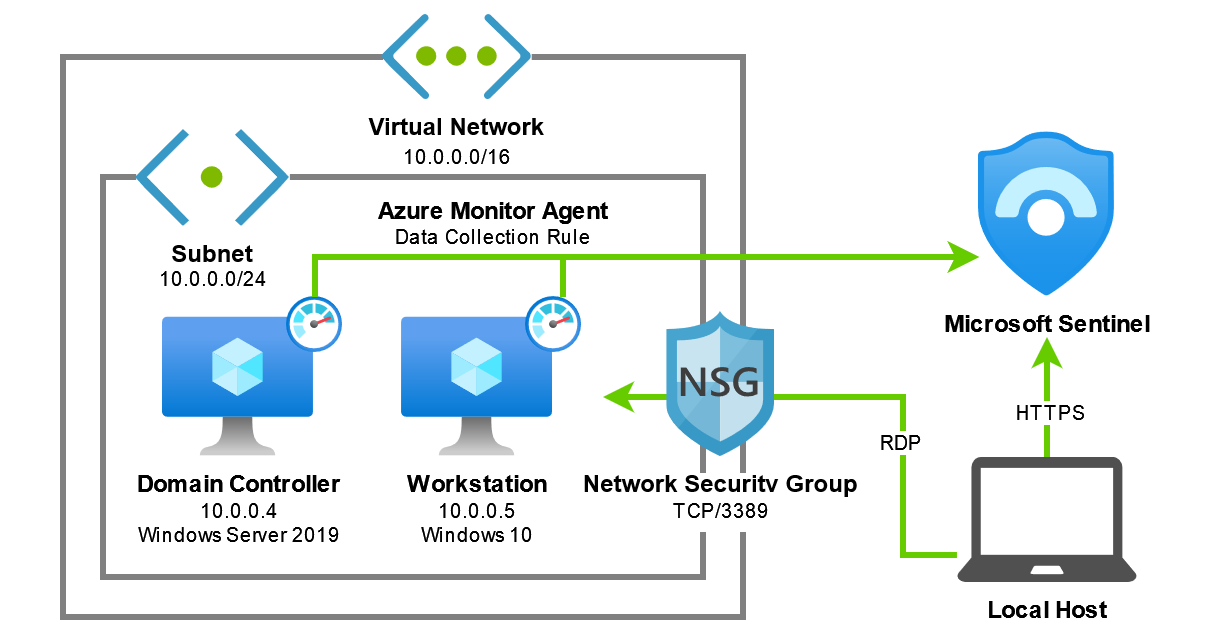
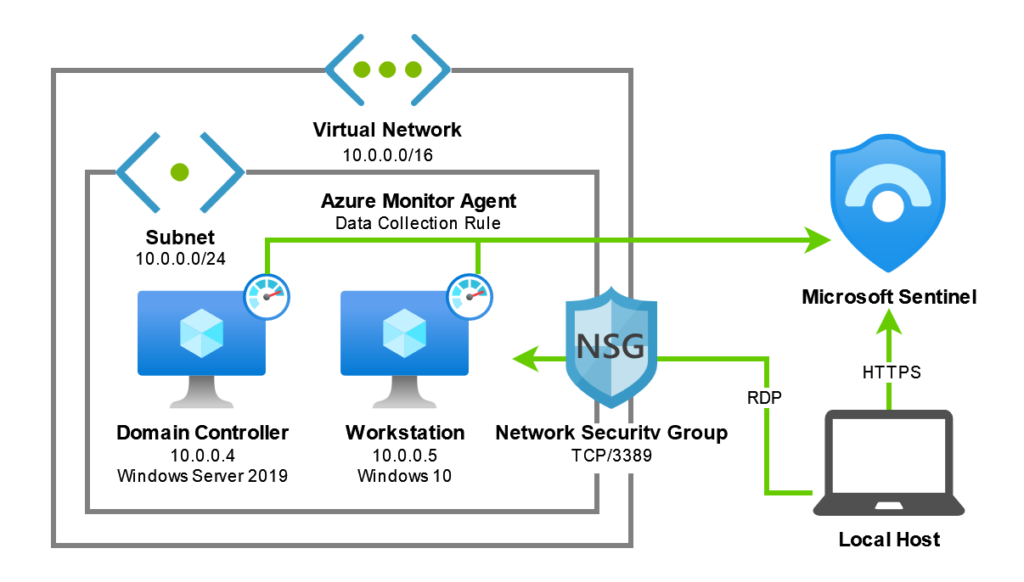
Now that we’ve got a local machine set up for authoring Bicep files we can start planning the deployment of our lab environment. In short, our goal is to provision the following resources:
- Virtual network, consisting of a default subnet and a network security group to restrict inbound RDP traffic to our local machine (since we don’t want to leave anything unnecessarily exposed to the internet)
- Windows Server 2019 virtual machine, configured as a domain controller
- Windows 10 virtual machine, configured as a domain-joined workstation
- Microsoft Sentinel instance, with a data collection rule configured to ingest common Windows security events from both virtual machines
In order to translate these requirements into a Bicep template we must understand any dependencies they may have on other resources; for example, to deploy a virtual machine we first need to create a network interface card, which in turn needs to be associated to a subnet within an existing virtual network. In most cases Bicep is able to determine these dependencies implicitly and deploy our resources accordingly. However, some conceptual dependencies (such as the requirement for the domain controller to be provisioned and configured before we can domain-join the workstation) must be declared explicitly, and we’ll need to keep that in mind when designing our Bicep template. Refer to the Bicep documentation for more information on resource dependencies.
You can use the resource visualiser to explore the relationships between existing resources at the Azure Resource Manager level. Here’s an example from an already-deployed version of this lab environment:
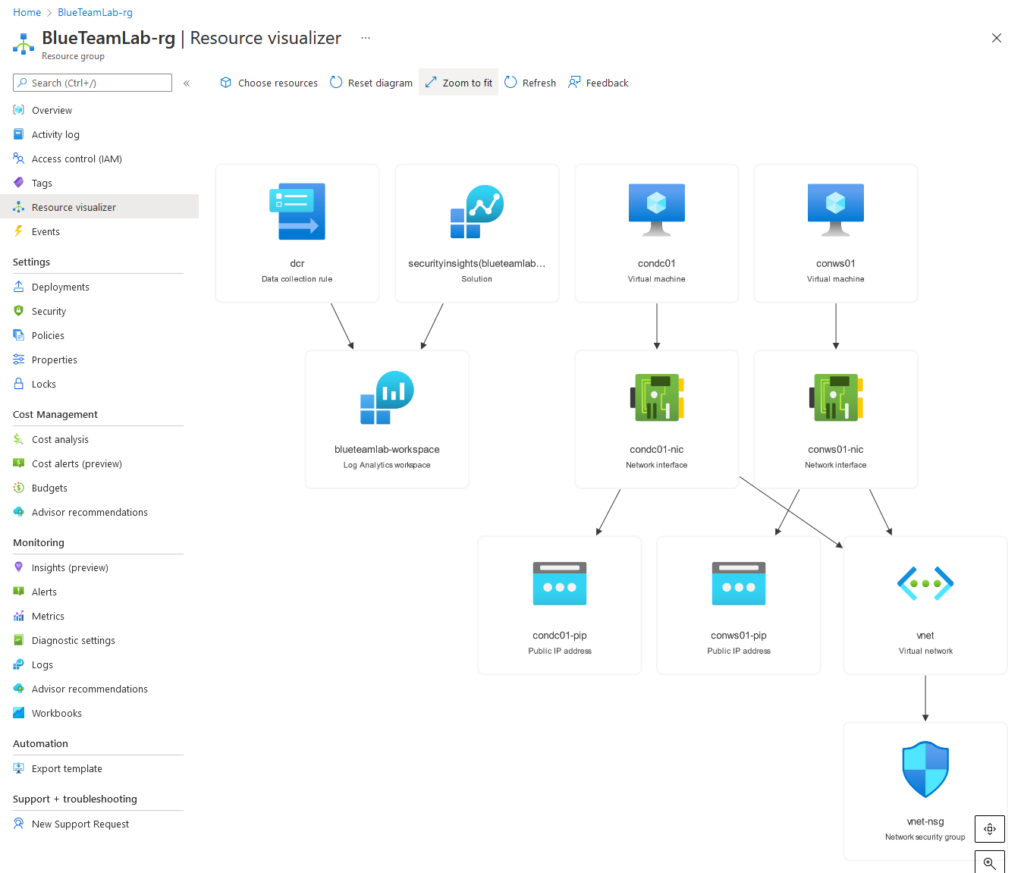
With this in mind, our step-by-step plan for deploying this lab environment is as follows:
- Declare all of the parameters we’ll need to deploy our resources, such as the names of our virtual machines and the virtual network’s address space.
- Create a virtual network, a default subnet and a network security group associated with that subnet.
- Create a Windows Server 2019 virtual machine to act as our domain controller.
- Install the Active Directory Domain Services role and any associated features on the server (e.g. RSAT), create the Active Directory forest, promote the server to a domain controller and reboot the virtual machine.
- Update the virtual network to use the new domain controller as it’s primary DNS server.
- Create a Windows 10 virtual machine to act as our workstation.
- Join the workstation to the domain and reboot the virtual machine.
- Create a Log Analytics workspace and install the Microsoft Sentinel solution.
- Create a data collection rule to send common Windows security events to Microsoft Sentinel, and associate the rule with both the domain controller and workstation virtual machines.
Reviewing the GitHub repository
All of the code described in this post is available on GitHub, and I highly recommend checking out the repository as you follow along since I will only be explaining the key concepts of the deployment rather than going through everything line-by-line:
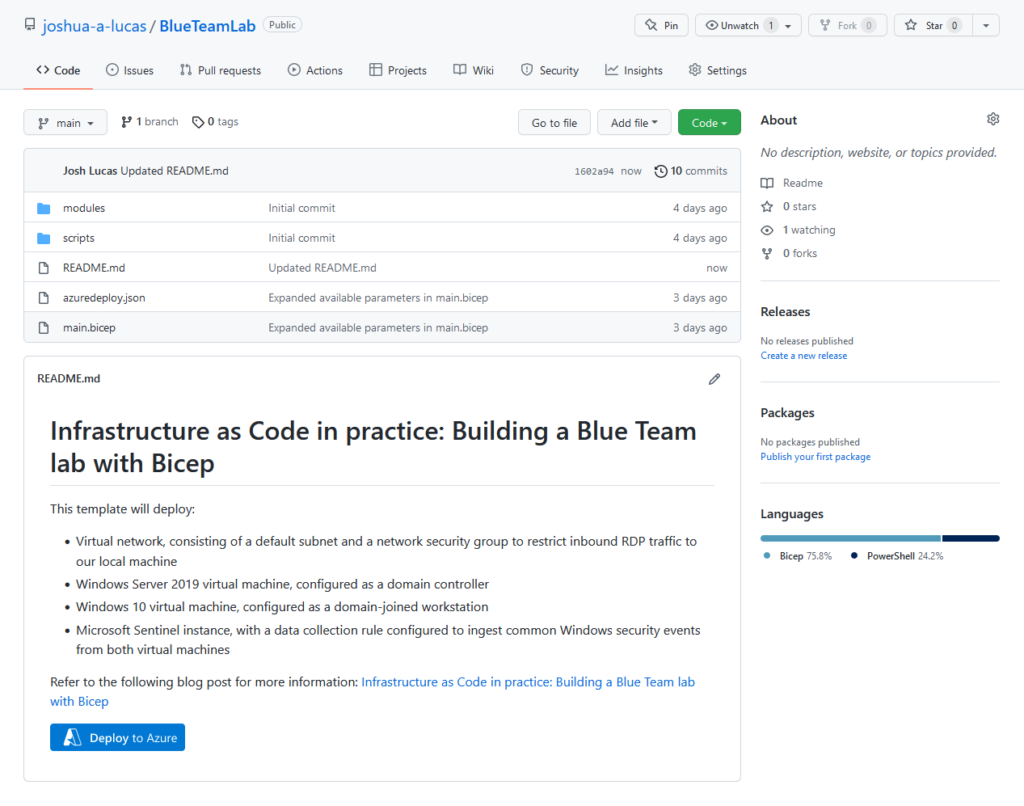
Here’s a quick overview of the repository’s core files and directory structure:
1
2
3
4
5
6
7
8
9
10
11
12
13
14
15
BlueTeamLab
│   azuredeploy.json
│   main.bicep
│   README.md
│
├───modules
│       network.bicep
│       sentinel.bicep
│       vm.bicep
│
└───scripts
        Deploy-DomainServices.ps1
        Deploy-DomainServices.zip
        Join-Domain.ps1
        Join-Domain.zip
main.bicep- the main Bicep file responsible for deploying the lab environment.azuredeploy.json- the compiled ARM template referenced by the ‘Deploy to Azure’ button in the GitHub repository.modules- a folder containing several Bicep modules that encapsulate the steps required to deploy logically-related resources.scripts- a folder containing the scripts required to create a new Active Directory forest on the domain controller and join the workstation to the domain, which we’ll discuss in a later section.
With that all covered, let’s start exploring the deployment in more detail.
Deploying the virtual network
As per our deployment checklist, the first step is to declare all of the parameters we’ll need to deploy our resources. Here’s a snippet from the start of main.bicep:
1
2
3
4
5
6
7
8
9
10
11
12
13
14
15
16
17
18
19
// Virtual machine parameters
@description('Name for the domain controller virtual machine.')
param domainControllerName string = 'DC01'

@description('Name for the workstation virtual machine.')
param workstationName string = 'WS01'

@description('Size for both the domain controller and workstation virtual machines.')
@allowed([
  'Standard_DS1_v2'
  'Standard_D2s_v3'
])
param virtualMachineSize string = 'Standard_DS1_v2'

// Domain parameters
@description('FQDN for the Active Directory domain (e.g. contoso.com).')
@minLength(3)
@maxLength(255)
param domainFQDN string = 'contoso.com'
Here we declare parameters for the names of our domain controller and workstation, the size of the virtual machines we’ll be deploying, and the fully-qualified domain name of the Active Directory domain we want to create. We use decorators (e.g. @description) to provide metadata and enforce constraints for our parameters, such as the allowed list of virtual machine sizes or the minimum/maximum lengths of our domain name.
Once all of our parameters have been declared, the next step is to create the virtual network that will house our compute resources. We define a module in main.bicep that references network.bicep and supply the value of several parameters we declared earlier:
1
2
3
4
5
6
7
8
9
10
11
12
// Deploy the virtual network
module virtualNetwork 'modules/network.bicep' = {
  name: 'virtualNetwork'
  params: {
    location: location
    virtualNetworkName: virtualNetworkName
    virtualNetworkAddressSpace: virtualNetworkAddressSpace
    subnetName: subnetName
    subnetAddressRange: subnetAddressRange
    allowedSourceIPAddress: allowedSourceIPAddress
  }
}
As you would expect, network.bicep contains code that encapsulates the deployment of a new virtual network. It declares:
- Parameters the module expects to receive as input, such the address space in IPv4 CIDR notation
- A network security group with a single rule to allow inbound RDP traffic from an allowed IP address range to resources within the virtual network
- A virtual network with a single default subnet that is associated with the new network security group
Here’s a snippet of the virtual network resource declaration in network.bicep:
1
2
3
4
5
6
7
8
9
10
11
12
13
14
15
16
17
18
19
20
21
22
23
24
25
26
// Deploy the virtual network and a default subnet associated with the network security group
resource vnet 'Microsoft.Network/virtualNetworks@2021-05-01' = {
  name: virtualNetworkName
  location: location
  properties: {
    addressSpace: {
      addressPrefixes: [
        virtualNetworkAddressSpace
      ]
    }
    dhcpOptions: {
      dnsServers: ((!empty(dnsServerIPAddress)) ? array(dnsServerIPAddress) : json('null'))
    }
    subnets: [
      {
        name: subnetName
        properties: {
          addressPrefix: subnetAddressRange
          networkSecurityGroup: {
            id: nsg.id
          }
        }
      }
    ]
  }
}
We use a conditional expression in the resource declaration to optionally instruct the virtual network to use a custom DNS server (rather than the Azure-provided defaults) if a value for the dnsServerIPAddress parameter was provided as an input. This allows us to reuse network.bicep to update the primary DNS server once the domain controller has been deployed without having to write any new code.
At the end of the module we return the default subnet ID as an output to main.bicep so that it can be referenced later in the deployment:
1
output subnetId string = vnet.properties.subnets[0].id
Deploying the domain controller
Once the virtual network has been deployed we can begin deploying our virtual machines. Back in main.bicep, we define a module that references vm.bicep and supply the parameters relevant to the creation of a domain controller, including the default subnet ID we received as output from network.bicep:
1
2
3
4
5
6
7
8
9
10
11
12
13
14
15
16
17
// Deploy the domain controller
module domainController 'modules/vm.bicep' = {
  name: 'domainController'
  params: {
    location: location
    subnetId: virtualNetwork.outputs.subnetId
    vmName: domainControllerName
    vmSize: virtualMachineSize
    vmPublisher: 'MicrosoftWindowsServer'
    vmOffer: 'WindowsServer'
    vmSku: '2019-Datacenter'
    vmVersion: 'latest'
    vmStorageAccountType: 'StandardSSD_LRS'
    adminUsername: adminUsername
    adminPassword: adminPassword
  }
}
As before, vm.bicep contains code that encapsulates the deployment of a new virtual machine. It declares:
- A dynamic public IP address with a DNS label
- A network interface card with a dynamic private IP address configuration that is associated with the default subnet of our virtual network
- A virtual machine with a system assigned managed identity and the Azure Monitor Agent extension installed
Here’s a snippet of the virtual machine resource declaration in vm.bicep:
1
2
3
4
5
6
7
8
9
10
11
12
13
14
15
16
17
18
19
20
21
22
23
24
// Deploy the virtual machine
resource vm 'Microsoft.Compute/virtualMachines@2021-11-01' = {
  name: vmName
  location: location
  properties: {
    // Properties have been redacted from this snippet for the sake of brevity
  }
  identity: {
    type: 'SystemAssigned'
  }

  // Install the Azure Monitor Agent
  resource ama 'extensions@2021-11-01' = {
    name: 'AzureMonitorWindowsAgent'
    location: location
    properties: {
      publisher: 'Microsoft.Azure.Monitor'
      type: 'AzureMonitorWindowsAgent'
      typeHandlerVersion: '1.0'
      autoUpgradeMinorVersion: true
      enableAutomaticUpgrade: true
    }
  }
}
We provision the virtual machine with a system assigned managed identity because it is a prerequisite for installing the Azure Monitor Agent extension, which itself is declared as a child resource that implicitly depends on the virtual machine.
At the end of the module we return properties such as the private IP address of the virtual machine as an output to main.bicep:
1
2
output privateIpAddress string = nic.properties.ipConfigurations[0].properties.privateIPAddress
output fqdn string = pip.properties.dnsSettings.fqdn
Deploying Active Directory Domain Services
The next step on our checklist is to deploy Active Directory Domain Services on our domain controller… but this is where things get tricky.
Bicep is great at performing control plane operations (i.e. deploying Azure resources) but it’s not really designed to manage anything on the data plane (i.e. the operating system of a virtual machine, or the contents of a database). Azure has several options for running scripts in your virtual machines, but in order to deploy Active Directory Domain Services on our domain controller we’ll need to use something that’s both idempotent and will persist through a reboot, which rules out using a run command or the custom script extension.
This is where PowerShell Desired State Configuration (DSC) comes in. Like Bicep, we create a file that describes what we want - such as an Active Directory domain controller with RSAT installed - and give that file to Windows, which goes and figures out how to make everything so.
Covering the fundamentals of PowerShell DSC is outside of the scope of this post, so I won’t go into much more detail than that today, but here’s an example from the ActiveDirectoryDsc repository that illustrates how you’d create a configuration to deploy a new Active Directory forest on a Windows server:
1
2
3
4
5
6
7
8
9
10
11
12
13
14
15
16
17
18
19
20
21
22
23
24
25
26
27
28
29
30
31
32
33
34
35
36
37
Configuration ADDomain_NewForest_Config
{
    param
    (
        [Parameter(Mandatory = $true)]
        [ValidateNotNullOrEmpty()]
        [System.Management.Automation.PSCredential]
        $Credential
    )

    Import-DscResource -ModuleName PSDesiredStateConfiguration
    Import-DscResource -ModuleName ActiveDirectoryDsc

    node 'localhost'
    {
        WindowsFeature 'ADDS'
        {
            Name = 'AD-Domain-Services'
            Ensure = 'Present'
        }

        WindowsFeature 'RSAT'
        {
            Name = 'RSAT-AD-PowerShell'
            Ensure = 'Present'
        }

        ADDomain 'contoso.com'
        {
            DomainName = 'contoso.com'
            Credential = $Credential
            SafemodeAdministratorPassword = $Credential
            ForestMode = 'WinThreshold'
            DependsOn = '[WindowsFeature]ADDS'
        }
    }
}
Once you have your PowerShell DSC configuration, we can use the Publish-AzVMDscConfiguration cmdlet from the Azure PowerShell module to create a .zip file that bundles both the configuration script and any dependent resource modules (e.g. ActiveDirectoryDsc) together. This .zip file can then uploaded to a location such as a storage account or GitHub repository and pushed to your Azure virtual machines using the PowerShell DSC extension.
Referring back to main.bicep, this is exactly what happens after the domain controller resource is deployed. We declare the PowerShell DSC extension as having an explicit dependency on the domain controller, reference the GitHub repository containing the Deploy-DomainServices.zip DSC configuration bundle, and pass through our desired domain name and domain admin credentials as inputs:
1
2
3
4
5
6
7
8
9
10
11
12
13
14
15
16
17
18
19
20
21
22
23
24
25
26
27
28
29
30
// Use PowerShell DSC to deploy Active Directory Domain Services on the domain controller
resource domainControllerConfiguration 'Microsoft.Compute/virtualMachines/extensions@2021-11-01' = {
  name: '${domainControllerName}/Microsoft.Powershell.DSC'
  dependsOn: [
    domainController
  ]
  location: location
  properties: {
    publisher: 'Microsoft.Powershell'
    type: 'DSC'
    typeHandlerVersion: '2.77'
    autoUpgradeMinorVersion: true
    settings: {
      ModulesUrl: 'https://github.com/joshua-a-lucas/BlueTeamLab/raw/main/scripts/Deploy-DomainServices.zip'
      ConfigurationFunction: 'Deploy-DomainServices.ps1\\Deploy-DomainServices'
      Properties: {
        domainFQDN: domainFQDN
        adminCredential: {
          UserName: adminUsername
          Password: 'PrivateSettingsRef:adminPassword'
        }
      }
    }
    protectedSettings: {
      Items: {
          adminPassword: adminPassword
      }
    }
  }
}
Once the Active Directory Domain Services role has been installed and the server has been promoted to a domain controller with the PowerShell DSC extension, we can reuse the network.bicep module to update our existing virtual network’s primary DNS server accordingly:
1
2
3
4
5
6
7
8
9
10
11
12
13
14
15
16
// Update the virtual network with the domain controller as the primary DNS server
module virtualNetworkDNS 'modules/network.bicep' = {
  name: 'virtualNetworkDNS'
  dependsOn: [
    domainControllerConfiguration
  ]
  params: {
    location: location
    virtualNetworkName: virtualNetworkName
    virtualNetworkAddressSpace: virtualNetworkAddressSpace
    subnetName: subnetName
    subnetAddressRange: subnetAddressRange
    allowedSourceIPAddress: allowedSourceIPAddress
    dnsServerIPAddress: domainController.outputs.privateIpAddress
  }
}
Deploying the workstation
With the domain controller now deployed and fully configured, provisioning a Windows 10 workstation is simply a matter of reusing the vm.bicep module to create a new virtual machine using an image from the desired publisher, offer and SKU combination. You can use the [az vm image list-skus](https://docs.microsoft.com/en-us/cli/azure/vm/image?view=azure-cli-latest#az-vm-image-list-skus) command from the Azure CLI to find the image you’d like to deploy:
1
2
3
4
5
6
7
8
9
10
11
12
13
14
15
16
PS C:\Users\joshu\Desktop\BlueTeamLab> az vm image list-skus -l australiasoutheast -f Windows-10 -p MicrosoftWindowsDesktop -o table

Location            Name
------------------ ---------------------------
australiasoutheast  19h1-ent
australiasoutheast  19h1-ent-gensecond
australiasoutheast  19h1-entn
australiasoutheast  19h1-entn-gensecond
australiasoutheast  19h1-evd
australiasoutheast  19h1-pro
australiasoutheast  19h1-pro-gensecond
australiasoutheast  19h1-pro-zh-cn
australiasoutheast  19h1-pro-zh-cn-gensecond
australiasoutheast  19h1-pron
australiasoutheast  19h1-pron-gensecond
...
As before, once the workstation has been deployed we can use Bicep to install the PowerShell DSC extension on the virtual machine, only this time we reference the Join-Domain.zip DSC configuration bundle to perform the domain join (which uses the ComputerManagementDsc module behind the scenes).
Deploying Microsoft Sentinel
All that’s left now is to deploy the Log Analytics workspace, install the Microsoft Sentinel solution and create a data collection rule to ingest common Windows security events from our virtual machines Still in main.bicep, we define a module that references sentinel.bicep and supply the relevant parameters:
1
2
3
4
5
6
7
8
9
10
11
// Deploy the Microsoft Sentinel instance
module workspace 'modules/sentinel.bicep' = {
  name: 'microsoftSentinel'
  params: {
    location: location
    logAnalyticsWorkspaceName: logAnalyticsWorkspaceName
    retentionInDays: logAnalyticsWorkspaceRetention
    sku: 'PerGB2018'
    dailyQuotaGb: logAnalyticsWorkspaceDailyQuota
  }
}
Once again, sentinel.bicep contains code that encapsulates the deployment of a Microsoft Sentinel instance. It declares a Log Analytics workspace, installs the Microsoft Sentinel solution on top of the workspace, and finally returns the value of the Log Analytics workspace resource ID to bicep.main.
Next, we declare a data collection rule that specifies the kind of resource we’re collecting logs from (i.e. Windows), the destination Log Analytics workspace, the streams that the data will be sent to (i.e. ‘Microsoft-SecurityEvent’, which determines the schema that will be used in Log Analytics), and a list of xPath queries that define the type of Windows events that will be collected:
1
2
3
4
5
6
7
8
9
10
11
12
13
14
15
16
17
18
19
20
21
22
23
24
25
26
27
28
29
30
31
32
33
34
35
36
37
38
39
40
41
42
43
// Create data collection rule
resource dcr 'Microsoft.Insights/dataCollectionRules@2021-04-01' = {
  name: 'DCR'
  location: location
  kind: 'Windows'
  tags: {
    createdBy: 'Sentinel'
  }
  properties: {
    dataFlows: [
      {
        destinations: [
          logAnalyticsWorkspaceName
        ]
        streams: [
          'Microsoft-SecurityEvent'
        ]
      }
    ]
    dataSources: {
      windowsEventLogs: [
        {
          name: 'windowsSecurityEventLogs'
          streams: [
            'Microsoft-SecurityEvent'
          ]
          xPathQueries: [
            // Remaining xPath queries have been redacted from this snippet for the sake of brevity
          ]
        }
      ]
    }
    description: 'Data collection rule to collect common Windows security events.'
    destinations: {
      logAnalytics: [
        {
          name: logAnalyticsWorkspaceName
          workspaceResourceId: workspace.outputs.workspaceResourceId
        }
      ]
    }
  }
}
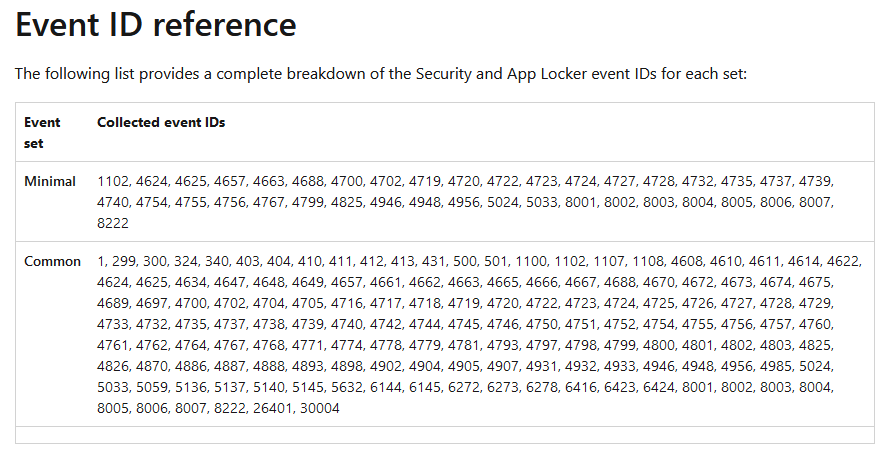
In this lab environment we define xPath queries to collect the following Security and AppLocker event IDs as a baseline:
Finally, we create a data collection rule association with both the domain controller and workstation to begin collecting event logs from these virtual machines. Here’s a snippet of the association with the domain controller:
1
2
3
4
5
6
7
8
9
10
11
12
13
14
15
16
// Create a data collection rule association for the domain controller
resource domainControllerVm 'Microsoft.Compute/virtualMachines@2021-11-01' existing = {
  name: domainControllerName
}

resource domainControllerAssociation 'Microsoft.Insights/dataCollectionRuleAssociations@2021-04-01' = {
  name: '${domainControllerName}-dcra'
  dependsOn: [
    workspace
    domainControllerConfiguration
  ]
  scope: domainControllerVm
  properties: {
    dataCollectionRuleId: dcr.id
  }
}
That’s it! We can now finally deploy the finished Bicep template to Azure and begin playing with our lab environment.
Running the deployment
When you’re ready, you can either click the ‘Deploy to Azure’ button in the GitHub repository or use the Azure CLI as we did in the beginning of this post to deploy our Infrastructure as Code. You should see something like this if you choose to deploy the template via the Azure Portal:
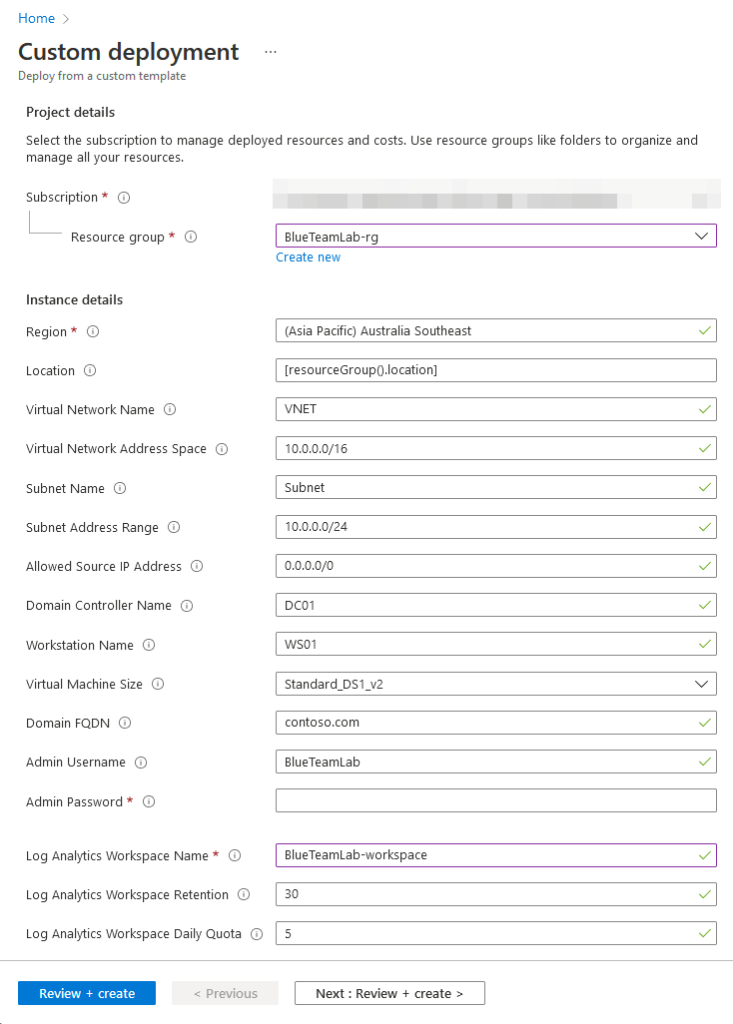
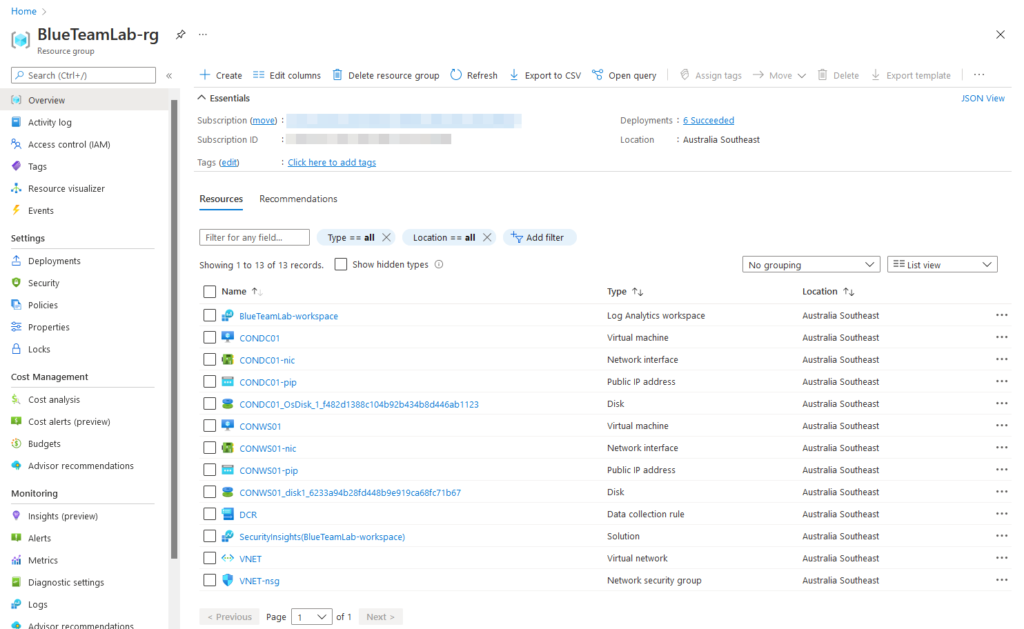
Fill out the parameters, click ‘Review + Create’ and begin the deployment. Keep in mind that the deployment may take up to 30 minutes to complete successfully - this is mainly due to the time it takes to create a brand new Active Directory forest, promote the domain controller and domain join the workstation. Once the deployment is complete your resources should have been provisioned successfully:
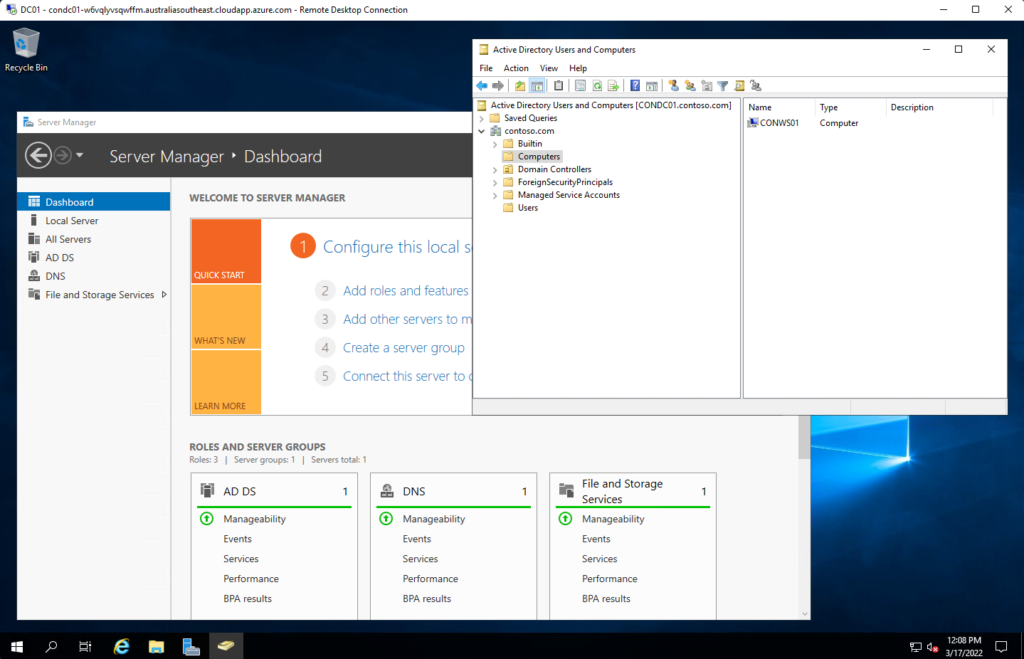
You can connect to the domain controller to confirm the Active Directory domain has been set up correctly:
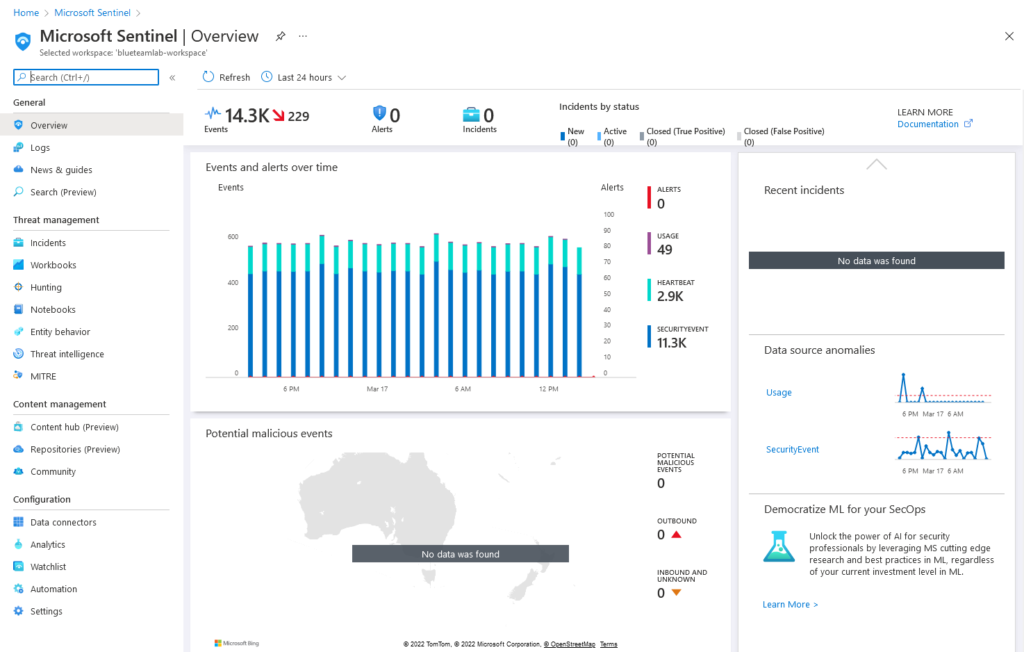
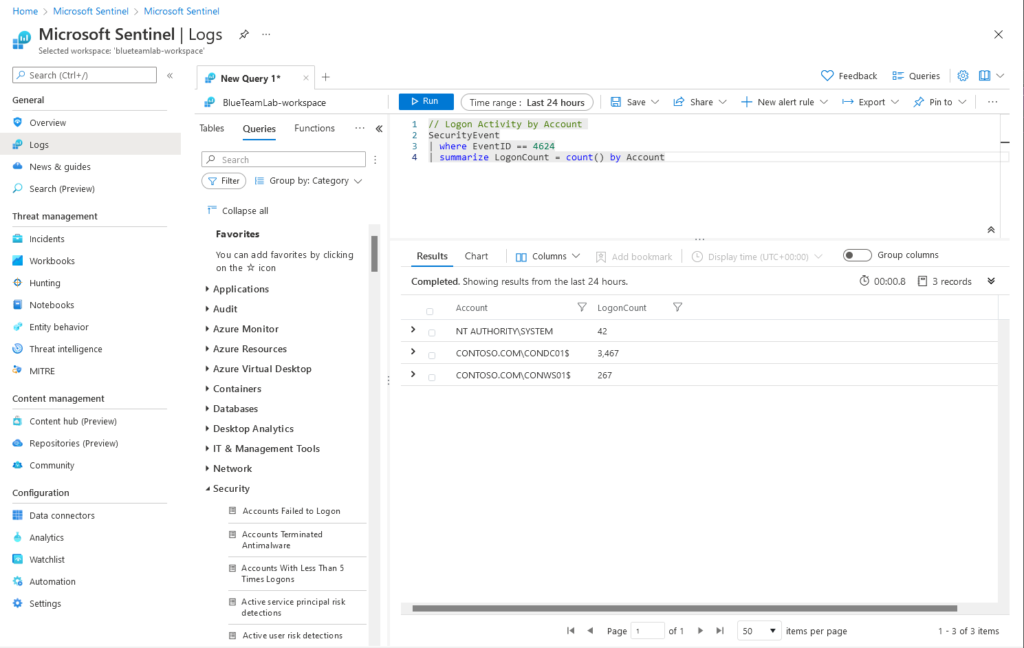
After a few minutes Microsoft Sentinel should start ingesting security events from both virtual machines via the ‘Windows Security Events via AMA’ data connector, which you can verify with a simple KQL query:
Conclusion
In this post we used Bicep to automate the deployment of a Blue Team lab environment in Azure consisting of an Active Directory domain, Microsoft Sentinel and the Azure Monitor Agent. While this environment is a perfectly good starting point, here’s a few improvements to consider implementing if you want to further hone your automation skills:
- Install Sysmon on all virtual machines in the domain using PowerShell DSC
- Use GitHub Actions to create a basic CI/CD pipeline that automatically redeploys the Bicep template every time a new commit is pushed to the
mainbranch of the repository
Thanks for reading if you made it this far!